Recording Electric and Acoustic Guitar
Recording Electric Guitar
Regardless of what you are recording, the first thing to think about is how it sounds at the source.
Before you record electric guitars, always make sure you are using new strings. Electric guitar strings seem to hold their tone longer than acoustic guitar strings, so you might get a few days out of them if they haven't been played eight hours a day and had a lot of sweat on them. But I'd rather be sure that string tone is not an issue and just replace them. Occasionally, you might find someone who is looking for a "deader" sound and likes old strings, but that is the exception, not the rule. New strings have a brilliance and life to them that old strings have lost.
With electric guitars, there are many places that your sound can be sabotaged, including faulty pickups, wiring, pots (volume and tone controls), cables, effects, batteries, and a host of amplifier issues. Any time there is a bad sound coming from the speaker, eliminate all the extras, one at a time, until you find what is causing that bad sound. I can't troubleshoot that for you. It's amazing how many folks don't keep their gear in shape and show up to record with broken "stuff." Sometimes the simplest thing is to substitute different guitars, cables, and amps to find where the problem is. In general, I'm not a believer in super expensive cables giving you better tone, but super cheap ones can sure kill your sound. I think middle of the road cables are fine. Any blind listening test I ever read, proved that no one can hear improved tone from high end cables.
Guitar pickups are probably the most important part of the electric guitar tone equation (along with the amp). There are three main types of pickups: single coil, double coil (or humbuckers), and P90 (which is a single coil). Although there are many different variations of each pickup type, for the most part, they sound like this: single coil pickups are the brightest and have great definition; double coil humbuckers sound thicker and have more bass; P90's are somewhere in between single and double coils. Single coils (like most Strats and Teles) usually cut through the mix well. Humbuckers (like most Les Pauls and SGs) sound fat and even a little blurry (which can help single notes sound bigger.) And once again, P90's are somewhere in between. When a single coil pickup is too bright and thin, but a humbucker is to bassy and lacks definition, a P90 may do the job.
Cheap guitars tend to use cheap pickups. Some cheap pickups just flat out sound bad. And there may be no fix, other than to find a better guitar, or replace the pickup. Some pickups sound better with certain amps. I kind of like humbuckers with Marshall amps (or other amps with a Marshall type sound) and single coil guitars with Fender amps (or other amps with a Fender type sound). I think that the big bass response of a humbucking pickup works nicely with the trebly sound of a Marshall amp. I think the bright single coil pickups are balanced by the big bass response of the Fender amp. And many a great recordings have been made with Les Pauls and Marshalls or with Strats and Fender amps. All that being said, there are a lot of guitarists who have awesome tone playing single coils through Marshalls or humbuckers through Fender amps. Often times, a lot of EQ needs added later because a pickup with the wrong tone for the song was used when recording. So spend some time listening to the guitar in the song and take some time to try guitars with other pickups to help you make the right decision.
Along with the pickup, the amplifier is the biggest part of electric guitar tone. There are so many amps that can be used that I won't start down that road very far. But for most of rock, country, and blues, tube amps are usually considered to give the best tone. Solid state amps are cheaper to make and buy and maintain. But they usually have inferior tone, although the Roland Jazz Chorus amps are very popular. Some famous jazz and metal guitarists (and others) prefer the clean hifi sound of solid state amps. But there aren't many. Some artists will mix a solid state amp with a tube amp when recording to gain definition, but that's not common.
Tubes go bad over time. And some folks will start with cheap or used tubes in their amp. It's good to make sure the amp's tubes are sounding their best before you record. If that means buying new tubes and getting the amp biased, then so be it. Sometimes you have to spend money to do things right. When re-tubing your amp, there are a lot of choices of tubes available and a lot of opinions about which tubes sound better. Do some research and take your best shot with the tube manufacturers. At the time of this writing, Tung-Sol, Mesa, and Electro-Harmonix are very respected tube manufacturers (or re-branders). Some brands of tube amps that a lot of artists use for great tone are: Mesa/Boogie, Soldano, Marshall, Fender, Vox, Bogner, and many others. Most amplifier manufacturers make cheaper amps and solid state amps that often don't sound as good as their more expensive amps. In the end, your amp will have a huge impact on the sound. Choosing the right amp is a big part of getting great guitar sounds recorded.
The settings on your amp are important also. Using too much reverb can lock you into a corner with your sound. It's best to take it easy on the reverb and use a little less than you might need, since you can always add more later in the mix. Unless there is a particular reverb sound that you are sure is an important part of your sound that you want to print to tape, use a little less to start. Your amount of distortion coming from pedals and your amp gain are important to your sound, but can gut the quality of your tone when over done. Guitarists often over use distortion in the studio. Once again, use a little less than you might normally, as too much distortion can't be fixed in the mix.
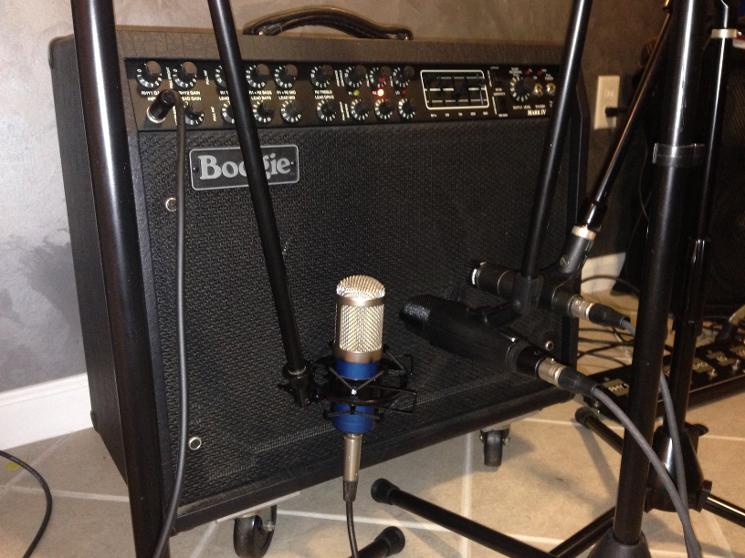
Hopefully, we now have good tone at the source and it's time to record. Common microphones used for electric guitar are the Shure SM57, Sennheiser MD421, AKG C414, or Royer R121, among others. The SM57 is a small diaphragm dynamic microphone. You will see more amps mic'ed with this than any other mic. The Sennheiser MD421 is a large diaphragm dynamic mic. The 421 has a nice bottom end and gives a bassier sound from the amp. The C414 is a condenser mic with a brighter sound. The R121 is a ribbon mic with a controlled top end that can tame an amp that sounds too brittle. More than one mic can be used at the same time, mixing the different sounds of these mics. The are a lot of other microphones made by other manufacturers that will also do a great job.
Mics can be placed anywhere from right against the speaker grill to up to 12" away (multiple mic configurations may have other mics further away). Many mics have a cardioid pickup pattern and have a proximity effect when used close to the amp. The bass response will be louder when the mic is very close. This can be used to get extra bass into your sound. It can also cause too much bass to be recorded. Look at the mic's manual to see if it is a cardioid and exhibits the proximity effect.
The position the mic is placed relative to the speaker will change the sound, also. Mics placed at the center of the speaker will pick up more bass, and mics placed near the outside of the speaker circle will pick up less bass. It is a good idea to move your mic around some to find the best sound. A good starting point might be an inch away from the grill cloth and halfway between the speaker center and outer edge. When amps have more than one speaker, you should try micing them one at a time to see if any sound better than the others.
The microphone doesn't have to point directly perpendicular to the grill cloth. Since microphones pick up differently from the sides and back, angling the microphone to 45 degrees from the grill will change the sound, usually losing some treble response and resulting in a more mid-rangey sound. Rotate your mic at dfferent angles and see how it affects the sound, and choose whatever you like.
Amps can be mic'ed using one, two, or three mics. Using one mic can give a great defined sound. Bringing in a second mic can add some color and dimension. The second mic can be placed beside the first mic up close, or it can be placed further back, even across the room. The room mic usually picks up the sound bouncing around the room. As the room mic is added to the close mic, the combined sound can start to exhibit weird combing effects depending on whether the mics are in or out of phase with each other. The sound hits the close mic first and the room mic milliseconds later. As these sound combine in the mixer, you may hear changes that sound like more or less bass, or other strange effects. I find it's best to listen to the bottom end of the guitar sound as you move the room mic to different distances from the amp. When the bottom sounds the fullest, leave the mic there. Phase can also be addressed by moving the waveform in the DAW, but that is addressed in the mixing section. A third mic can be added. The usual configuration might be to have two close mics and one room mic. Try to keep all the close mic diaphragms at the same distance from the speakers, to keep them in phase with each other. Note that you may need to look inside the microphone to determine the location of the diaphragm within the mic. while more mics can add more color to your sound, they can also cause more phase issues for you to deal with. If you have plenty of time and patience, multiple mics on an amp can be very rewarding. If you are in a hurry or have a large band to record, multiple mics may not be the best idea.
Multiple amplifiers can be used also. Some artists have a distorted amp and like to mix in a cleaner amp for definition. Once again, be careful of out of phase issues when doing this. An amp signal can also be mixed with a direct (DI) signal. The direct signal can be recorded directly and then re-amped later, or run through an amp simulator. If you don't own a lot of amps, an amp simulator plugin in your DAW, or a dedicated amp simulator like a Line 6 POD, can give you amp sounds for a lot of amps you don't have access to. It is good to mix real amp sounds with the simulated amp sounds, since many simulators don't have quite the tone quality of the original amp. The simulators are getting closer to the real amp sounds every year.
As with recording anything, try to use decent mic cables. Again, I don't think much can be gained with ultra expensive cables. A good middle of the road mic cable should be fine. Remember that some mics mentioned require 48 volt phantom power from the mixer or interface. Condensors and some ribbon mics need phantom power. Dynamics do not. Your mic preamp may impart some change to your sound, but it probably won't be a huge change. A major recording magazine did blind listening tests with experts and home recordists to find out that no one could pick the expensive preamps from the middle grade preamps, with preferences often leaning toward the less expensive preamps. As with any recording, allow yourself plenty of headroom and don't record the amp too hot and let it distort the sound by hitting 0 dB with digital equipment or by going too far past 0 dB with analog gear. Recording the loudest peaks between -10 to -20 dB is loud enough, as most modern digital gear has plenty of headroom and low noise.
It is a good idea to make a test recording with the whole band, or with a pre-recorded track of the whole band, to see how your recorded guitar sounds mixed in with the rest of the recording. This should allow you to make changes to your sound before the final recording is done. Remember, it doesn't matter how the guitar sounds alone in a band recording. What matters is how the guitar sounds as part of the whole recording.
SUMMARY:
1. Use new strings
2. Use the right guitar pickups for the song
3. Use a good tube amp with good tubes in it
4. Take it easy on the reverb and distortion
5. Try different mics in different positions to improve the sound (an SM57 against the grill is common)
6. You can use two or three mics, but address phase issues with mic position
Recording Acoustic Guitar
As always, address the sound source before you worry about how to record it. With acoustic guitar, there's not a lot there to worry about. Just the guitar and the strings.
The quality of your guitar will make a difference here. More expensive acoustic guitars have solid wood back, sides, and top. Middle of the road acoustics have laminated wood back and sides and a solid top. The cheapest acoustics have laminated back, sides, and top. If at all possible, use an acoustic guitar with solid back, sides, and top. Solid woods resonate more than laminated wood, producing a fuller, more vibrant sound.
If an all solid wood guitar is not available, at least get a guitar with a solid top. Cedar tops are the most popular and produce a louder, pleasing tone. Mahogany tops are the next most popular and offer a warm tone that has less volume than a cedar top. There are many other woods used for acoustic guitar tops, and while some of them may sound OK, many are used for their looks and not their sound. So beware of other woods on acoustic guitar tops, and understand that they may not sound as pretty as they look. Avoid acoustics with laminated tops if possible.
The most popular wood for the guitar sides and backs is mahogany. Mahogany has a full, warm sound that is desirable. A slightly more expensive wood for the sides and back is rosewood. Rosewood tends to have a slightly harder sound and great articulation. A less common, high quality, wood for back and sides is maple. There are a variety of different types of mahogany, rosewood, maple, and newer woods like sapele (newer to be used regularly as guitar materials) that all may sound fine, depending on your opinion. Overall, just compare and listen to see what you like. In general, solid woods are good and laminated woods are bad; rosewood, mahogany, and cedar are good.
Always put on new strings before you are going to record. New strings have a brilliance and a life to them that old strings do not. There are a lot of different strings brands of strings you can try, and every one has their preference. For steel strings, I like the sound of strings with a 92/8 bronze composition more than strings with a 80/20 composition. To me the 80/20 strings seem a little too bright. The only way to find out which strings are best for you is to record several different ones until you find what you like. But your strings will have a big impact on your final sound. It's just a matter personal preference in the end.
Larger gauge strings may sound thicker and fatter than thinner gauge strings. Although I use light gauge strings for playing live I try to use medium gauge strings for recording. Some guitarists can't use heavier strings without then degrading their performance. It is more important that the artist plays their best. So use lighter strings if you notice issues in their playing when using medium gauge strings.
When it comes to micing the acoustic guitar, the most common method is to use a small diaphragm condenser mic placed 2" to 12" in front of the 12th fret and pointed just between the sound hole and the fretboard. Pointing the mic more toward the sound hole gives more bass, and pointing it more toward the fretboard gives less bass and a nice bright reflection of sound off the fretboard. If using a cardioid mic, placing the mic closer to the guitar will add bass due to the proximity effect. Placing the mic further away will lessen the bass and add more of the sound of the room and the sound bouncing around the room. If I'm recording others, I like to have someone move the mic around while the guitarists plays, until I find the sweet spot and leave the mic there. If I'm recording myself, I listen to the starting mic position through headphones, move the mic and listen again, move the mic and listen again, and repeat until I find the best sounding spot for the mic.
Success can also be achieved using large diaphragm condenser mics, ribbon mics, and dynamic mics on acoustic guitar. Condensers are more common as they have a nice top end sparkle that is pleasing and can cut through a busy mix. I have used both small and large diaphragm condensers with great success. Although many have produced great results with other types of mics. Popular choices for microphones for acoustic guitar include the Nuemann KM84 or KM184, Rode NT5 or NT55, AKG C1000 or C451 for small diaphragm condensers. The Neumann U87, AKG C414, Shure KSM44, or the Rode NT-1 are all popular large diaphragm mics. There are many others to choose from and you should be able to get good results out of most of them.
Microphones can be placed in other areas to get different sounds. Some like to place the mic near the guitarist's head pointed at the sound hole to get the sound the player hears. Some like to place the mic below the bridge and pointed at the bridge to get more guitar resonance. It is best to try different positions to see what works best for you.
It is common to use two mics on an acoustic guitar. One can be over the fretboard and the other one could be higher near the guitarist's head or lower down past the bridge. The placement of these mic may need adjusted somewhat as the phase issues associated with multiple mics will shape your tone. If they sound weird together or you notice a loss of bass when they are combined, just move one mic until the sound improves. The two mics can be panned in stereo if you like the sound of that.
Another two mic technique is to use an XY configuration or coincident pair, where one mic's capsule is directly above the other, making an "L" shape, with the mics at about 90 degrees to each other. The mics can be placed about 2 to 12" directly in front of the 12th fret with one mic pointing up the neck and one mic pointing at the sound hole. The advantage of this mic technique is that there should be no phase issues as the sound arrives at both capsules at the same time. The mic pointing at the neck will sound bright and the mic pointing at the sound hole will have more bass. Together, they should produce a full, stereo sound when panned opposite in the mix.
Single or double mic configurations can also add a direct signal (DI) from the guitar transducer. Just plug it in and adjust the tone and volume on the guitar until you have a good sound. I think the direct sound from an acoustic guitar transducer usually sounds poor on a recording by itself. But when mixed with microphones, the DI can add some hard sound and presence to the overall sound. Just remember to take it easy on the treble output by the DI, as this part of the sound from transducers tends to sound particularly fake. One mic and a DI can be mixed for a stereo sound, or two mics in stereo and the DI in mono is another option. You'll have to experiment with your panning at the mix stage to get the best results.
As always, the preamp needs adjusted so there is no distortion in the final sound. You don't want to hit 0 dB with digital equipment or by go too far past 0 dB with analog gear. Recording the loudest peaks between -10 to -20 dB is loud enough, as most modern digital gear has plenty of headroom and the noise floor is not usually a problem. A discussion on using compression and EQ when mixing is shown in the Mixing page.
You can also overdub beyond your original track and record another acoustic guitar playing with a capo on a different fret. For instance, if your first track is recorded with no capo, capo the guitar up the neck and record another track. This should add higher notes and a greater depth. You can also record a second track using an alternate tuning, like the Nashville tuning (where the low E, A, D, and G strings are replaced with thinner unwound strings). This can give you a 12 string style sound when the guitars are mixed together. You can also overdub a 12 string acoustic, mandolin or ukulele and add them into the mix, making your track have a fuller acoustic sound.
SUMMARY:
1. Use a quality acoustic guitar with solid wood back, sides, and top, if possible. Use guitars with rosewood or mahogany back and sides, and cedar tops, if possible. Avoid laminated guitars, if you can. If you can't afford a solid wood guitar, try borrowing one.
2. Always put on new strings before recording. String brand and model choice will affect your sound. Heavier gauge strings may sound better.
3. A small diaphragm condenser mic placed near the 12th fret is a good place to start. Move the mic around to find the best sound.
4. Using more than one mic, or adding a DI signal can improve your sound and give you stereo options.