Recording Acoustic Drums
Recording acoustic drums is one of the more challenging instruments for a recording engineer. Modern drum recording usually involves many microphones that all have to capture the sound of individual drums and combine to make a great drum sound in the end. There are a lot of variables involved in recording drums, from the drummer, to dynamics, to the song, and the drums themselves.
The quality of the kit you use will have an impact on your sound. Drums with only 4 lugs are probably cheap toys and will never sound great. While, in general, more expensive drums will sound better, you can get great sounds from modern inexpensive drum sets, costing only about $500, before cymbal cost. Modern drum making techniques do a great job of making quality drums with a good bearing edge that have a nice sound. Some older, vintage drums, that cost a pretty penny will not sound as good as their modern counterparts, due to advances in drum manufacturing.
I always prefer to have new drum heads before I record. Old drum heads sound dull and lifeless. Unless using old drum heads gives you a specific effect you are looking for, always use new drum heads when recording. Depending on how much you play them, you might get several days out of new drum heads. New drum heads have a bright sound with rich overtones that you can't get from old drum heads. Picking the proper drum heads for your project is important because different types of drum heads have a different sound that will define your drum sound. Here is an article about this important decision.
Tuning the drums properly is a critical step. A great kit will sound poor if the drums are not tuned well. You can get excellent drum sounds with a modern inexpensive kit that has new heads and is tuned well. If the drummer you are working with is not great at drum tuning, find someone who is. Many excellent drummers are not excellent drum tuners. Check out the drum tuning video on this site.
As with any instrument, it's important to listen to the sound of the kit in the room. Does the kit sound good where it's sitting in the room? Could the drums be moved to another place in the room and sound better? Should the drums be placed in a different room to get a better sound. You will have to do some testing to figure this out.
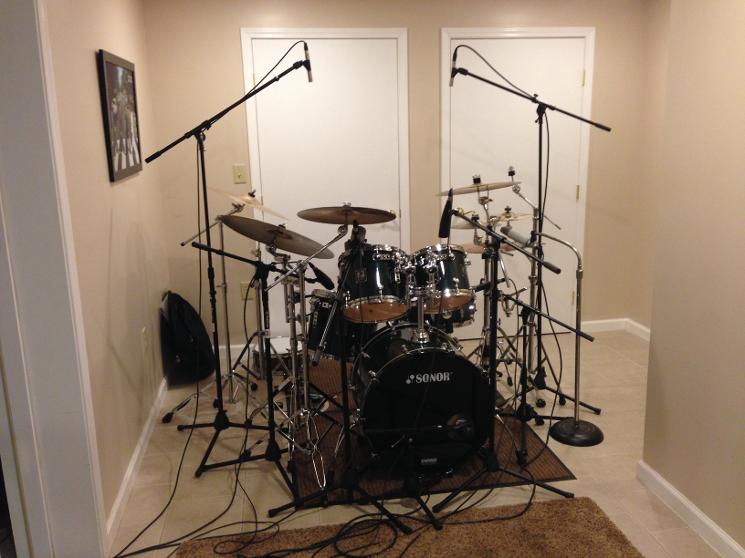
Now that we have a great sounding drum kit, let's talk about microphones. A drum kit can be mic'ed with as few as one mic, or as many as 2 mics per drum (maybe 3 or more for the bass drum) with overheads and many room mics. For this article, we will use a fairly standard config with one mic per drum with overheads and room mics. Remember that using multiple mics can cause weird combing effects as mics can get out of phase with each other when their sounds are combined. The more mics you have to combine, the more out of phase problems you are likely to create. It is not enough that each mic sounds good on the drum it is micing. The final, combined overall sound has to be good in the end.
The most common mics used on the bass drum are large diaphragm dynamic mics, like the AKG D112, Electro-Voice RE20, Audix D6, or Shure Beta 52A. Although, a nashville engineer once told me a Shure SM57 can't be beat, and others may prefer boundary mics or the speaker-based Yamaha Subkick. If there is a hole in the front head, a common mic position might be anywhere from a few inches inside the head to a couple inches outside the head, pointing in the hole. The mic can be pointed to several different areas inside the hole and each will produce very different sounds. It is best to move the position and direction around a good bit and listen for the best sound while the drummer plays the drum. If there is only one mic on the bass drum, usually you are listening for a good balance of both low end power and high end click (definition). If there is no hole in the front head, the mic should be moved around to find the best sound possible, usually being placed from 1" to a foot away from the front head. It is faily common to use more than one mic on the bass drum. A second mic could be placed elsewhere on the front head, or even on the batter head. A mic placed on the batter head may be able to capture the high end "click" better than the other mic. Some even combine three bass drum mics. For example, you could use a mic in the front head hole, add a Subkick pointed at another location on the front head, and a third mic pointed at the batter head where the beater hits the head. These three sounds could be combined with the front head hole mic giving the overall sound, and the Subkick adding the extreme low end bass, and the batter head mic adding the treble click to the sound.
The snare drum sound is very important, as it is often the loudest sound (along with the vocals) in the final mix. The most common mic you'll see on snare drums is the Shure SM57. You can get great results with many small diaphragm dynamic or condenser mics. You will usually see the snare mic placed about 1" above the top rim pointed at the center of the drum. Moving the mic closer to the stick impact will result in less resonance from the drum and more of the sound of the stick hitting the head. Moving the mic further back will give less attack and more resonance from the drum. You can add a second mic under the snare, if you want to capture the sound of the snares on the bottom. This mic is usually placed about 1" away from the drum head, pointed at the snares, and pointed away from the bass drum. You should probably reverse the phase of this mic when you mix, as it will be out of phase with the top mic. It is common for the close mic sound of the snare to be rather boring, as the full complexity of the snare sound is often only heard in through the room mics or overheads. The close snare mic will add body to the room mics when mixed together.
The toms usually get one mic per tom, placed about 1" above the rim and pointed at the center of the drum. Common mics used here are the Sennheiser MD421, Shure SM57, or other dynamic mics. I've used large diaphragm condenser mics on toms and gotten good results, usually giving more high end and less low end power. Some will mic both top and bottom heads of the toms, but this can leave you with too many mics to manage and a lot of phase issues in the end. If you do choose to add bottom mics, remember to invert the phase on the lower mics before you mix.
The hi hat mic is really only there to pick up the hi hat cymbals. This mic is sometimes not needed if the drummer plays the hi hats very loud. It is nice to record this mic, just in case you need it later in the mix. This mic is usually placed a few inches above the hi hat, without pointing it at the snare. A small diaphragm condenser is usually used here.
Overhead mics are used to pick up the sound of the entire kit, including the cymbals. Usually two overhead mics are used, although you could also only use one. If you are limited on mics or tracks, one overhead mic will do the job fine, while limiting your stereo image some in the end. When using two mics, they are usually placed with one on each side of the kit (left and right) about two feet above the cymbals as a spaced pair. Another option would be placing them together as a coincident pair, with the mic elements almost touching, at a 90 degree angle to each other. One of these mics would be pointing at each side of the kit. Common mics found here would be any small or large diaphragm condenser mics, like the Neumann U87, AKG C414, Neumann KM84, among others.
Room mics add the sound of the drums in the room to the overall sound. Being further from the kit, these mics pick up more of the sound bouncing around the room. This is sometimes the most realistic picture of what the drums actually sound like. Large diaphragm condensers are often used here. You could use one room mic, or use three or more, mixing them in later if the add character you want. Move the mics around to find the best spots in the room to get cool reverb sounds. Sometimes, one of these mics might be a cheap mic pointed at a window or at the ceiling. Experimentation is key here, as this mic will compliment the other sounds you are capturing and you want to go for "vibe" here. The smaller your room is, the less like it is that you can get a usable room sound.
It is important you check levels before recording, so you don't record anything too hot and add unintentional distortion that you can't get rid of later. When the drummer is wearing headphones, spend some time getting a good headphone mix for your drummer. It is usually not necessary to have a lot of the drums in the drummer's headphone mix, as the drummer will hear bleed from the room and feel the hits they play. If using a click, the click volume may need to be very loud in the mix for the drummer to hear it with all of the other sounds happening during recording.
See the mixing section to learn more about mixing your drum sounds.
Summary:
1. Put new drum heads on. Different type drum heads effect your sound.
2. Make sure the drums have been tuned for a great sound. Tuning drums is a special talent.
3. Pick mics that work for each drum.
4. If your room is big enough, room mics can add vibe.
5. Don't let your recording levels distort.